If your business emails go to spam, the first thing to check is not the subject line or the logo. It is your domain's DNS. This is where you specify which servers may send email on behalf of the business, how messages are signed, and what recipients should do when something looks suspicious.
In 2026, this is more than a technical detail. Gmail, Outlook, and Yahoo have become stricter about email authentication, especially for domains that send many messages or use newsletters, forms, online stores, CRM systems, and automations. The result is straightforward: a domain without correctly configured SPF, DKIM, and DMARC has weaker credibility and is easier to misuse for spoofing or phishing.
This tutorial explains what each record means, what to add to DNS, and how to follow the same process in Cloudflare. The examples are illustrative. Before copying them, you need to know which services actually send email for your own domain.
What problems do SPF, DKIM and DMARC solve?
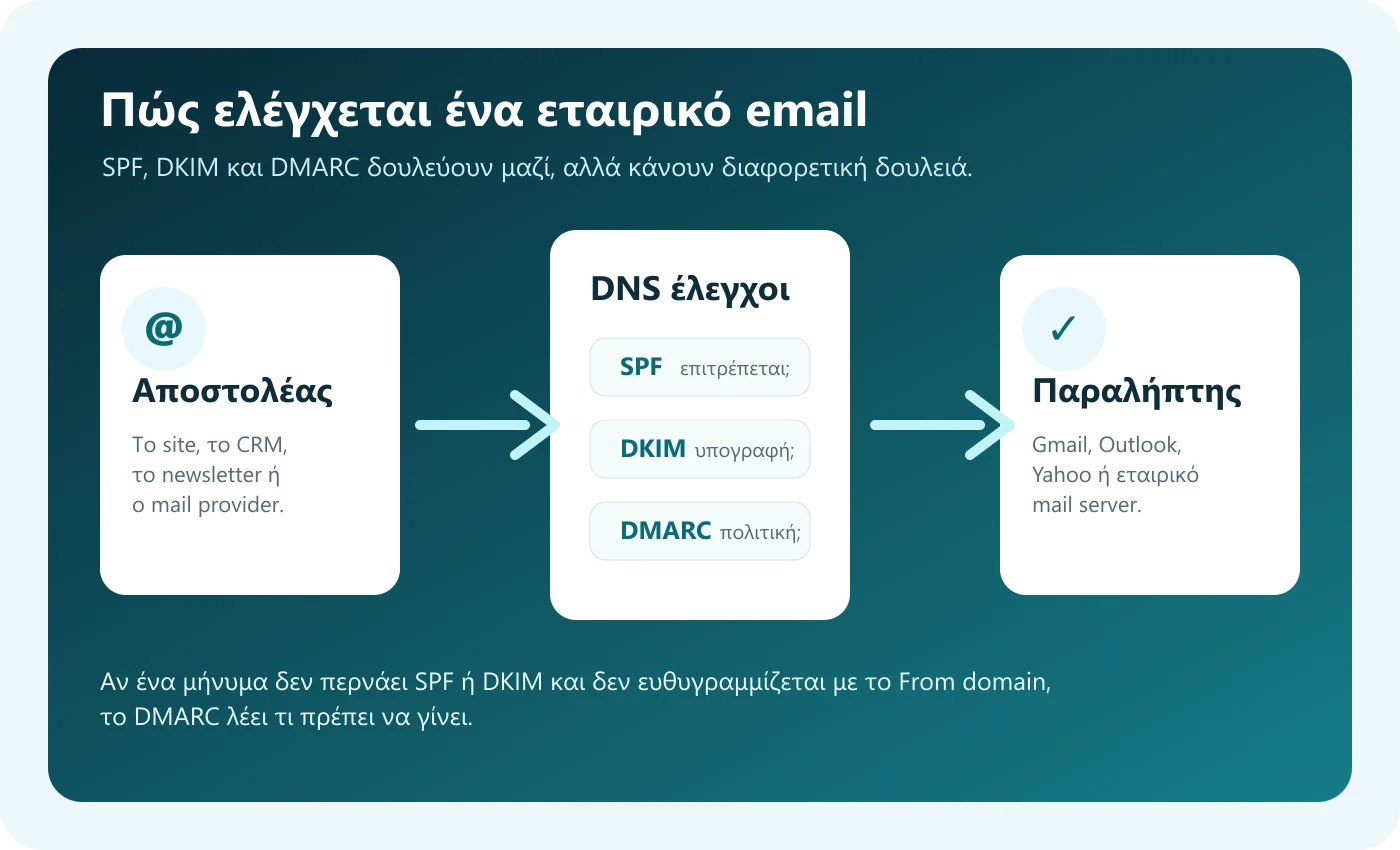
The common symptoms are familiar. You send a quote and the customer never sees it. Your WordPress contact form sends notifications that end up in spam. WooCommerce or PrestaShop sends order emails from the website's server, while the company's regular email runs on Google Workspace or Microsoft 365. Worse still, someone may try to send fake messages that appear to come from your domain.
SPF, DKIM, and DMARC do not, by themselves, guarantee that every email will always reach the inbox. Domain reputation, content, recipient lists, and user behaviour still matter. But without correct authentication, you start at a serious disadvantage.
Before changing DNS, list every email sender
The most important step comes before opening Cloudflare or cPanel. Make a short list of every source that sends email for the domain:
- Google Workspace, Microsoft 365, Zoho, or another email provider.
- cPanel mail or the hosting provider's SMTP server.
- WordPress, WooCommerce, PrestaShop, Laravel, or a custom website that sends form notifications and order emails.
- Newsletter tools such as Mailchimp, Brevo, MailerLite, or another email service provider.
- CRM, invoicing, helpdesk, booking, ERP, or automation platforms.
If you forget a legitimate source and apply strict DMARC too quickly, you may block real messages. That is why the process starts with monitoring and moves gradually towards enforcement.
Step 1: SPF — which servers may send email?
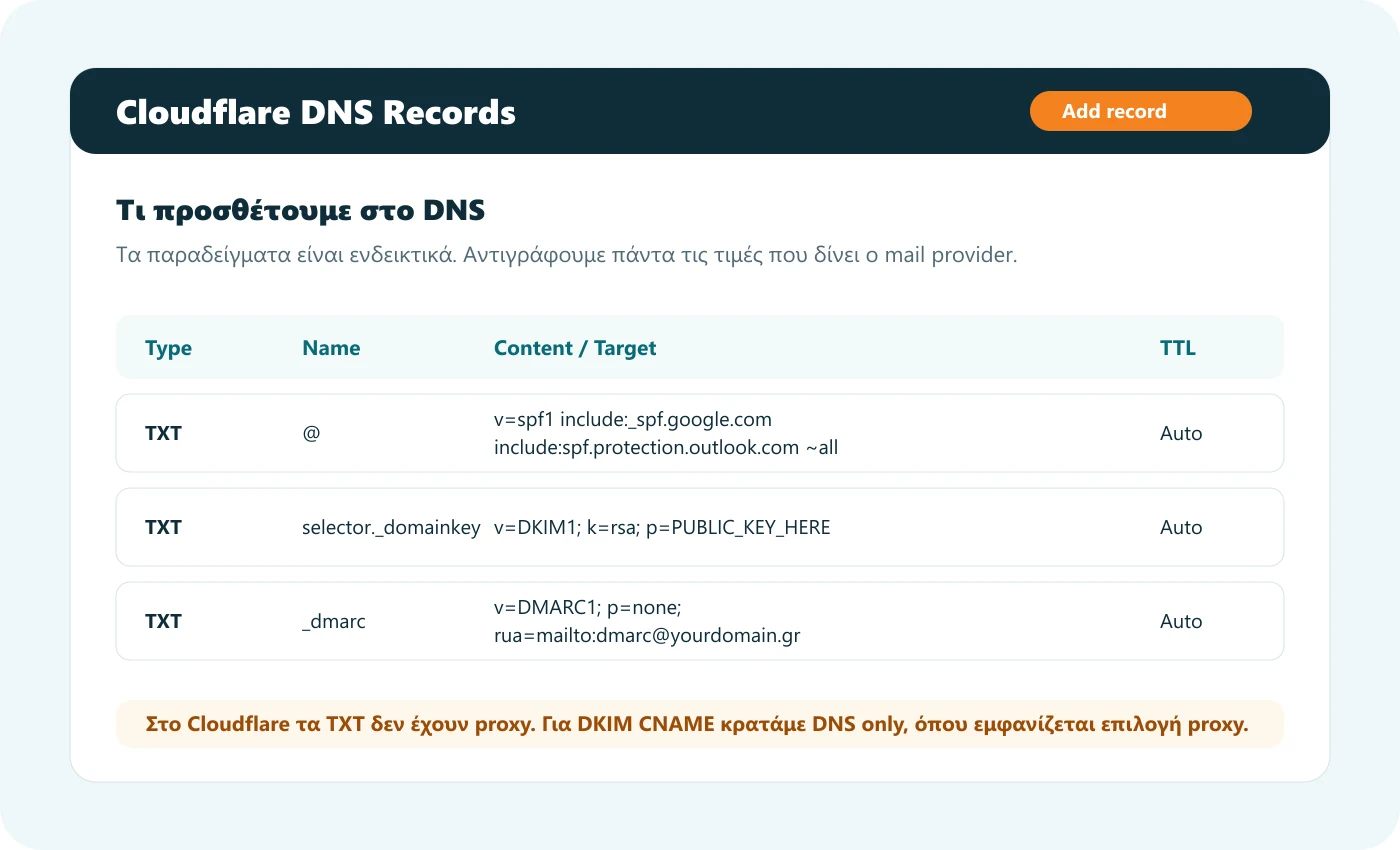
SPF is a TXT record in DNS. It tells recipients which servers are authorised to send email for the domain. If you use only Google Workspace, a simple example is:
Type: TXT
Name: @
Value: v=spf1 include:_spf.google.com ~all
If you use only Microsoft 365, a common example is:
Type: TXT
Name: @
Value: v=spf1 include:spf.protection.outlook.com ~all
If you have more than one sender, do not add a second SPF record. Combine the senders in one:
Type: TXT
Name: @
Value: v=spf1 include:_spf.google.com include:spf.protection.outlook.com include:spf.example-newsletter.com ~all
~all means soft fail. It is a more cautious starting point than marking every unlisted sender as a hard failure. -all is stricter and should be used only when you are confident that every sender has been listed. There must not be two different SPF records on the same domain. This is one of the most common mistakes.
Step 2: DKIM — the email's digital signature
DKIM signs email cryptographically. The email provider keeps the private key, while the public key is published in DNS. This allows the recipient to check that the signed message has not been altered and was signed by an authorised service.
You normally obtain DKIM details from the provider instead of writing them yourself. In Google Workspace, they are generated in the Admin console. Microsoft 365 usually provides CNAME records for selector1 and selector2. cPanel commonly has an Email Deliverability section showing SPF and DKIM.
A simplified example of a DKIM TXT record is:
Type: TXT
Name: selector1._domainkey
Value: v=DKIM1; k=rsa; p=PUBLIC_KEY_HERE
In practice, if your provider supplies a CNAME instead of a TXT record, use a CNAME. Do not change the record type yourself. If the provider supplies a different selector name, use that name.
Step 3: DMARC — what happens when a check fails?
DMARC connects SPF and DKIM to the domain the reader sees in the From field. Passing an SPF or DKIM check alone is not enough: it must also align with the domain displayed as the sender.
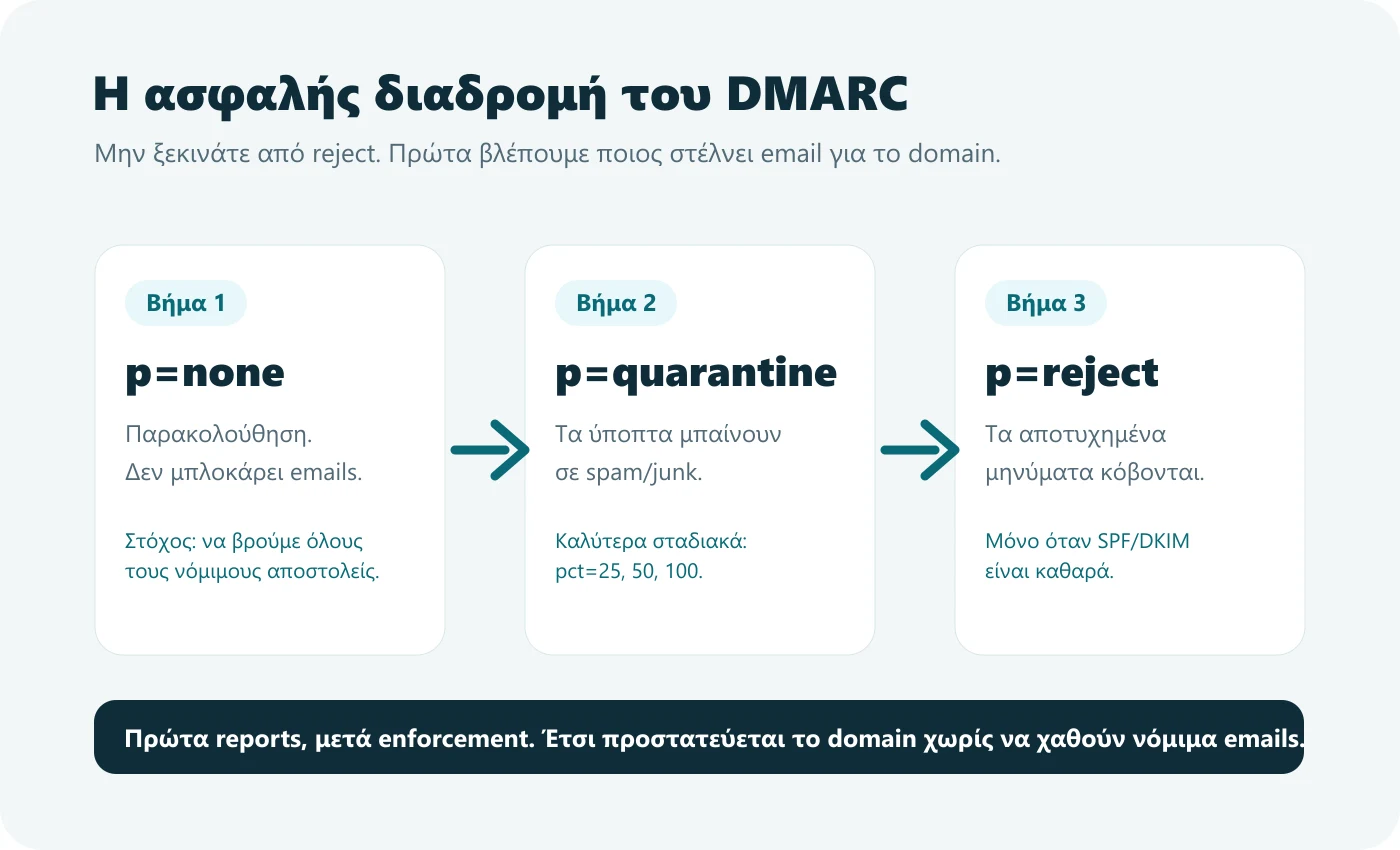
The right starting point is monitoring:
Type: TXT
Name: _dmarc
Value: v=DMARC1; p=none; rua=mailto:dmarc@yourdomain.gr; adkim=s; aspf=s
With p=none, the DMARC policy does not request blocking. You receive reports to see which services send for the domain and which fail authentication. For a small volume, you can use a mailbox such as dmarc@yourdomain.gr. For larger volumes, a DMARC reporting tool is more practical because the reports are XML and are not convenient for everyday reading.
After reviewing the results, you can move to a stricter policy:
Type: TXT
Name: _dmarc
Value: v=DMARC1; p=quarantine; rua=mailto:dmarc@yourdomain.gr; adkim=s; aspf=s
The final level is:
Type: TXT
Name: _dmarc
Value: v=DMARC1; p=reject; rua=mailto:dmarc@yourdomain.gr; adkim=s; aspf=s
Caution: do not switch straight to p=reject if you do not know every server sending email for your domain. You could block legitimate messages from contact forms, CRM systems, newsletters, online stores, invoicing tools, or automations.
The settings adkim=s and aspf=s mean strict alignment. They can be a target for a carefully configured setup, but complex environments may initially need relaxed alignment or a more cautious transition. Starting conservatively is reasonable. Moving to reject without evidence is the mistake.
How to configure the records in Cloudflare
If your domain uses Cloudflare nameservers, make DNS changes in Cloudflare, not in cPanel or at the registrar. This matters: your hosting panel may show the values you need, but if Cloudflare is the authoritative DNS provider, the records must be added there.
- Sign in to Cloudflare and open the domain.
- Go to DNS, then Records.
- Select Add record.
- For SPF, select TXT, enter
@in Name, and put the SPF value in Content. - For DKIM, use exactly the record type provided by your email service: TXT or CNAME.
- For DMARC, select TXT, enter
_dmarcin Name, and put the DMARC value in Content. - You can leave TTL set to Auto.
- Select Save, then check the configuration with a test email.
Cloudflare may add quotation marks to TXT records automatically. There is no need to keep adjusting quotes if the value is saved correctly. For DKIM CNAME records, keep DNS only if a proxy option is shown. Email authentication is not HTTP traffic and does not pass through the orange-cloud proxy.
If you use cPanel mail or hosting email
Many hosting packages include cPanel's Email Deliverability tool. It normally shows whether SPF and DKIM pass or are missing. If the domain does not use Cloudflare, cPanel may be able to repair them automatically. If DNS is managed in Cloudflare, however, cPanel cannot publish the records there itself. You need to copy the values into Cloudflare.
For WordPress websites, a common approach is an SMTP plugin that sends through the actual email provider instead of letting the web server send on its own. Contact forms, WooCommerce emails, and website notifications can then use infrastructure with correctly configured SPF and DKIM.
How to check that it works
After changing DNS, allow some time and send test messages to Gmail, Outlook, and Yahoo. In Gmail, open a message and select Show original. You should see SPF, DKIM, and DMARC pass. If any check fails, do not move on to quarantine or reject.
DMARC reports are not immediate. They usually need time and enough email traffic to provide useful evidence. For a small business, monitor for several days to a few weeks, depending on sending volume. Domains that send newsletters or transactional email need a particularly careful review.
The most common mistakes
- Two SPF records on the same domain instead of a single combined record.
- SPF that includes only Google or Microsoft even though the website sends email from the web server.
- A DKIM record published in the wrong DNS panel.
- A newsletter service using your domain in From without correct domain authentication.
- Contact forms using the customer's email as From instead of a business address on your domain.
- Moving straight to
p=rejectwithout DMARC reports. - Making changes in cPanel when the actual DNS is managed in Cloudflare.
Checklist before calling the work complete
- Every email sender has been recorded.
- There is only one SPF record.
- SPF includes every legitimate sender.
- DKIM is enabled at the email provider and published in DNS.
- DMARC starts with
p=nonefor monitoring. - The reports show which senders pass and which fail.
- The transition to
quarantineis gradual. - Only then do we move to
reject. - Tests cover website forms, the online store, CRM, and newsletters, not just webmail.
A careful implementation process
SPF, DKIM, and DMARC are practical settings a business can use to protect its domain and improve email reliability. They are not a magic switch for inbox placement, but they form the foundation. Without them, other deliverability work starts at a disadvantage.
The approach is straightforward: identify every sender, publish SPF and DKIM, start DMARC with reporting, and move to a stricter policy only after reviewing clear evidence.
If your business emails go to spam, or you need SPF, DKIM and DMARC configured correctly, we can review your domain and recommend a careful configuration that accounts for legitimate email sources. Contact iChipHost for a technical review of DNS, hosting, and email deliverability.
Sources
- Google Workspace Admin Help - Email sender guidelines
- Google Workspace Help - Set up SPF
- Google Workspace Help - Set up DKIM
- Yahoo Sender Hub - Sender Best Practices
- Microsoft Learn - Set up SPF for Microsoft 365 domains
- Microsoft Learn - Set up DKIM for Microsoft 365 domains
- Microsoft Learn - Set up DMARC for Microsoft 365 domains
- Cloudflare Docs - Create DNS records
- Cloudflare Docs - DNS record types
- Cloudflare Learning Center - DMARC, DKIM and SPF
- DMARC.org - Domain Message Authentication Reporting and Conformance
- Pexels image source